
Telegram is a versatile messaging app with a focus on speed and security. It allows users to exchange messages, photos, videos, and files of any type. Users can create channels or groups. It is popular among individuals and businesses.
By using Wiresk to connect Telegram with other applications, you can automate various workflows with flexibility.
With Telegram connected to Wiresk, you can send messages, media and manage users, or groups to public or private channel/group.
You can download the Telegram Desktop app at desktop.telegram.org or use Telegram web https://web.telegram.org.
We recommend utilizing Telegram web since it provides easier access to your telegram settings information.
1 – Wiresk Group system Copy Link
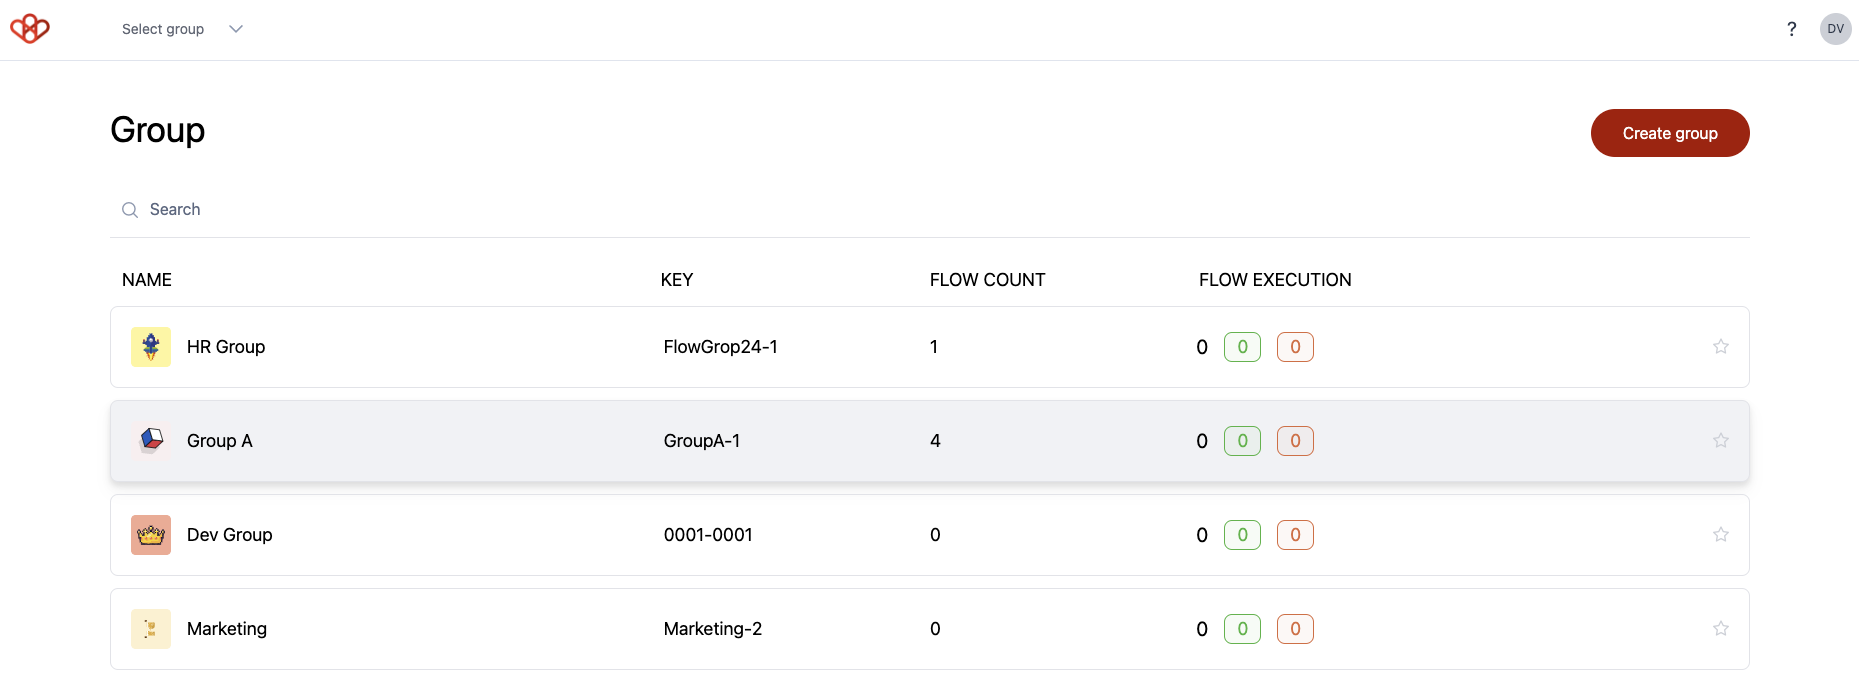
The group system in Wiresk is a way to organize and manage your users and Flows.
When you start with Wiresk(Admin account), you are automatically assigned to the default group. This default group can be renamed.
for users with Pro plan or higher, you can:
- Assign users to specific Flows: Control who has access to and can edit different Flows.
- Organize Flows: Group related Flows together for better management and visibility.
- Manage permissions: Set permissions for different groups, determining who can create, edit, and view Flows.
- Collaborate effectively: Facilitate collaboration among team members by assigning them to appropriate groups.
2 – Connect Telegram Bot to Wiresk Copy Link
A connection to your Telegram Bot is needed so we can sync it with our platform.
There is two ways to connect your app to Wiresk:
- In “My apps” section, where you can manage your connections
- During the creation of your Flow, in the flow builder. You can create a connection to your app on-the-go when you select Trigger or the Method.
In this documentation, we will explain how to create a connection in “My apps” section, it is essentially the same as when creating it on-the-go.
A – Add Telegram Bot app in Wiresk Copy Link
On the left panel of Wiresk user interface, go to “My apps” then search “Telegram Bot” in the search field or scroll down the list of apps and choose the Telegram icon.
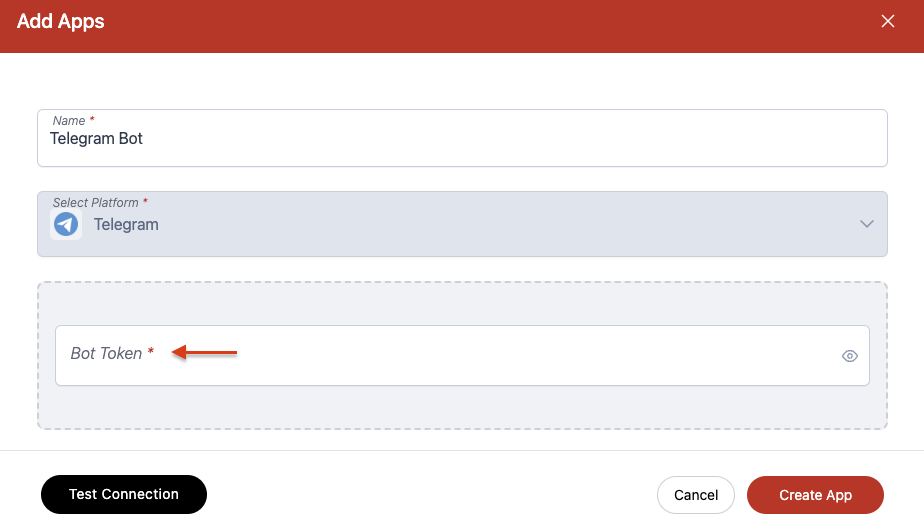
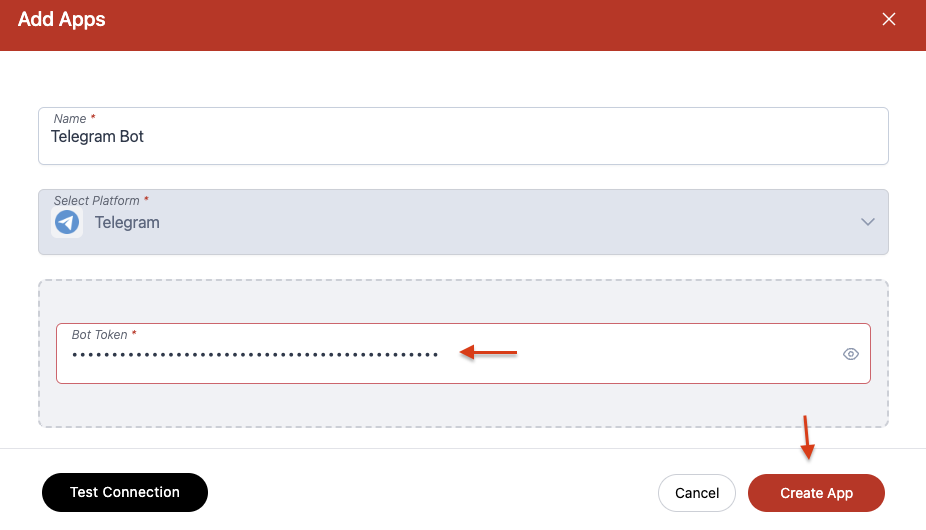
In the new screen, give a name to your connection, here we will name it “Telegram Bot”.
In the field named “Bot Token”, you need to enter the token from your Telegram Bot. Let’s go to your Telegram account to get this information.
B – Create a Bot in Telegram Copy Link
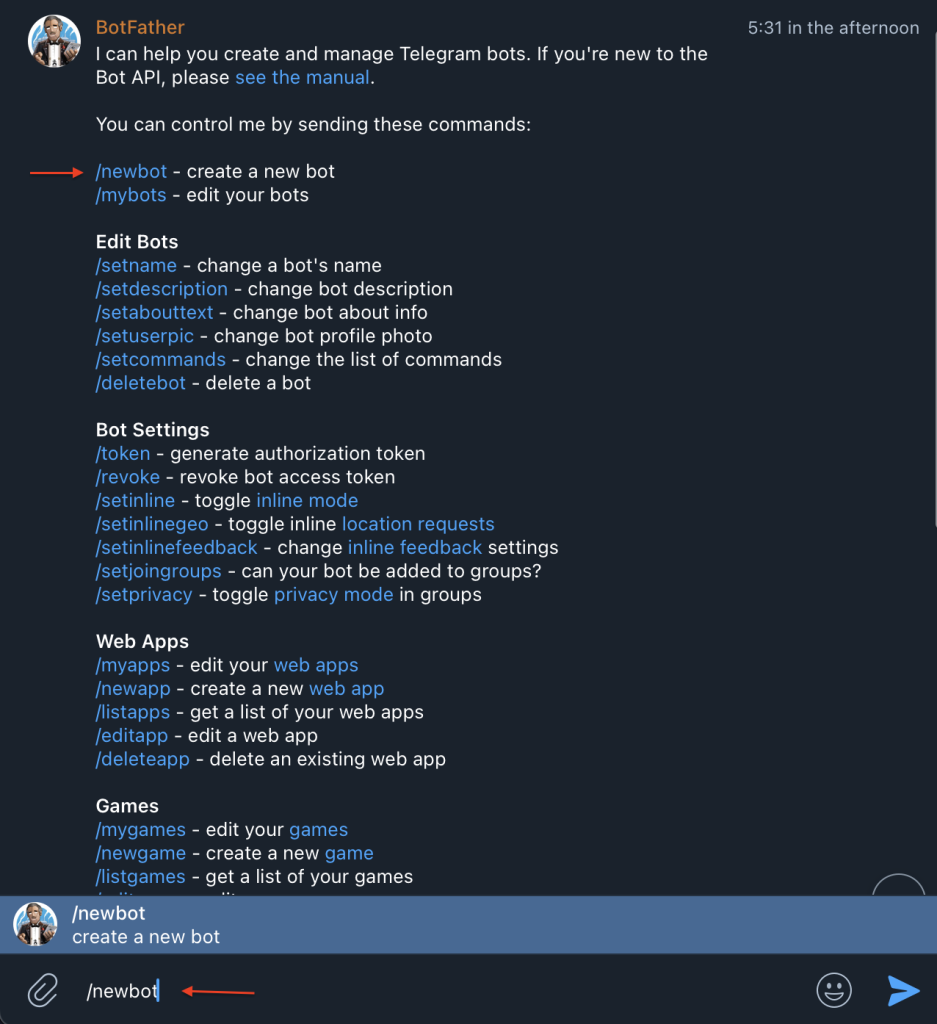
Let’s go to your telegram account, then search for BotFather or follow this link https://telegram.me/BotFather.
then in the new chat enter the command “/newbot” or click on “/newbot”.
BotFather will ask you to name your bot, here we will name it “Wiresk_test” then just send the message.
After that, give a username to your bot, here we use “Wiresktest_bot”.
You get a message that your bot has been created successfully and you are given the needed Token.
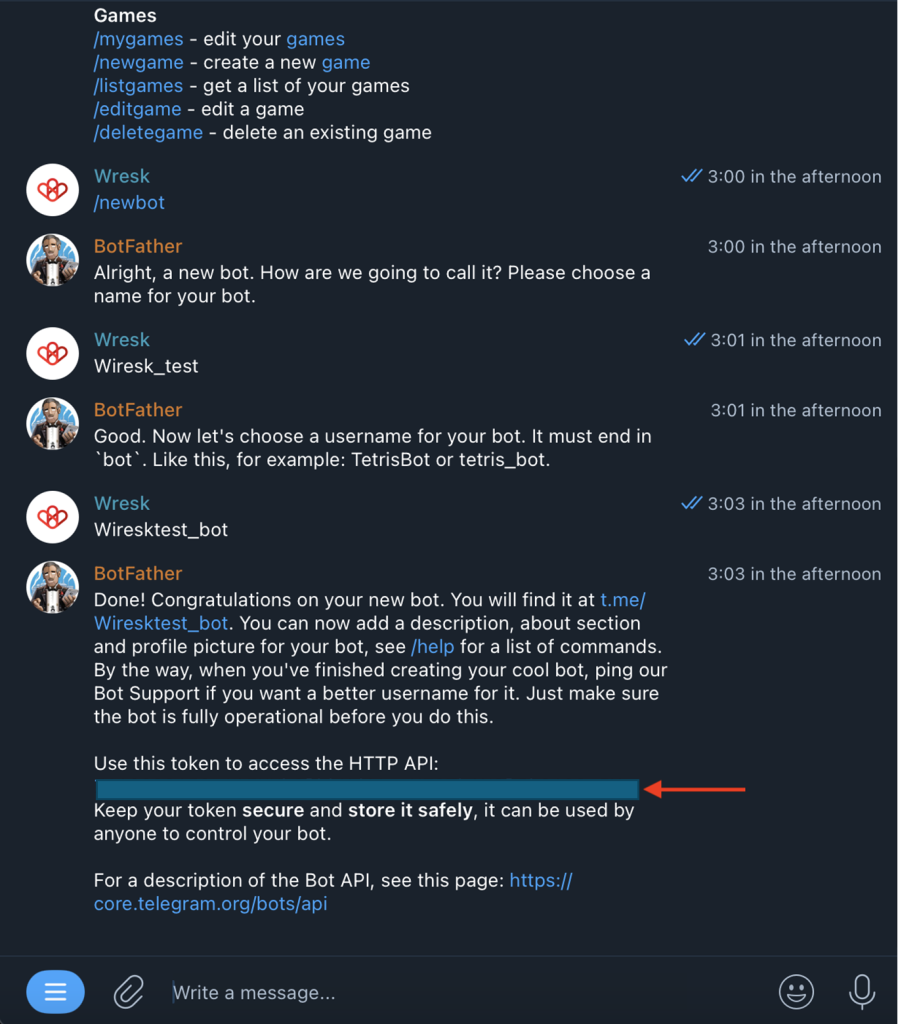
Now, copy the token and let’s go back to the connection window.
Past it in the field “bot token” then just click on the button “create app” and voila! It’s done, your Telegram app has been added to Wiresk.
C – How to find your Telegram Bot chat ID Copy Link
To use the Telegram Bot Methods:
– First add the Telegram Bot to your Telegram Group/Channel where you want to send the message or interact with
– Promote the bot to admin using either the Telegram Mobile Application or the Telegram Desktop Application.
Add Telegram bot to your Channel or Group: Copy Link
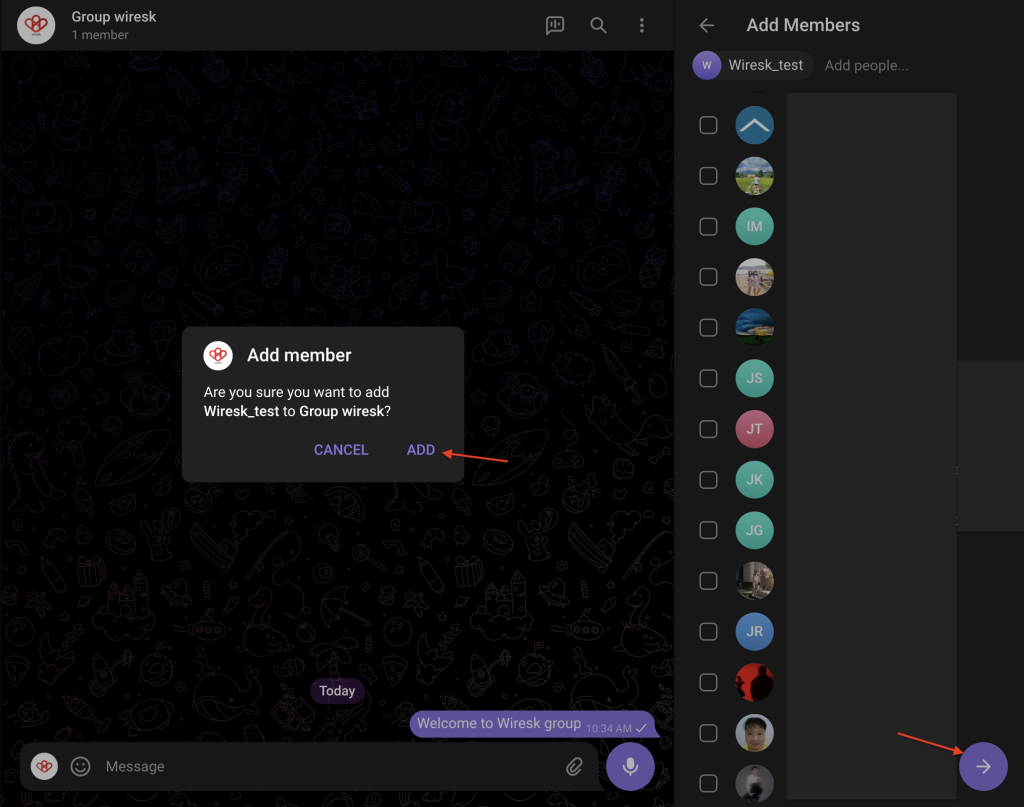
Open your channel or group then go to info settings by clicking on its name > Pen icon to edit.
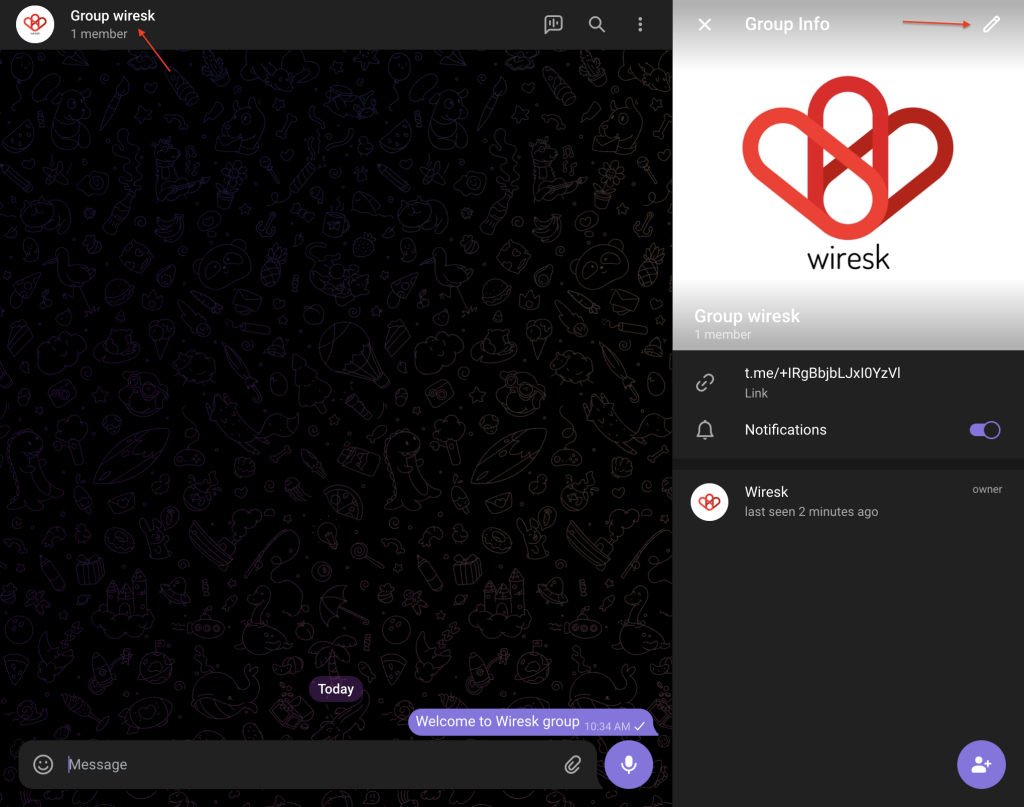
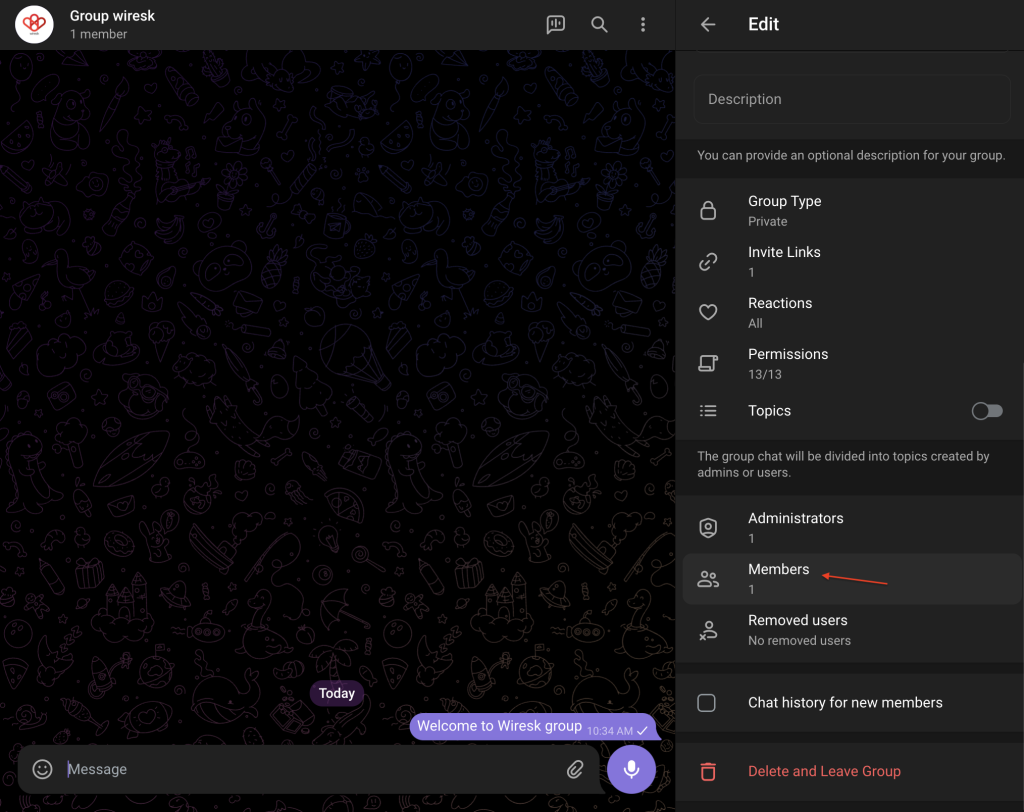
Scroll down and select “Members”, then click “add members” button.
Search your Telegram bot in “add people” field.
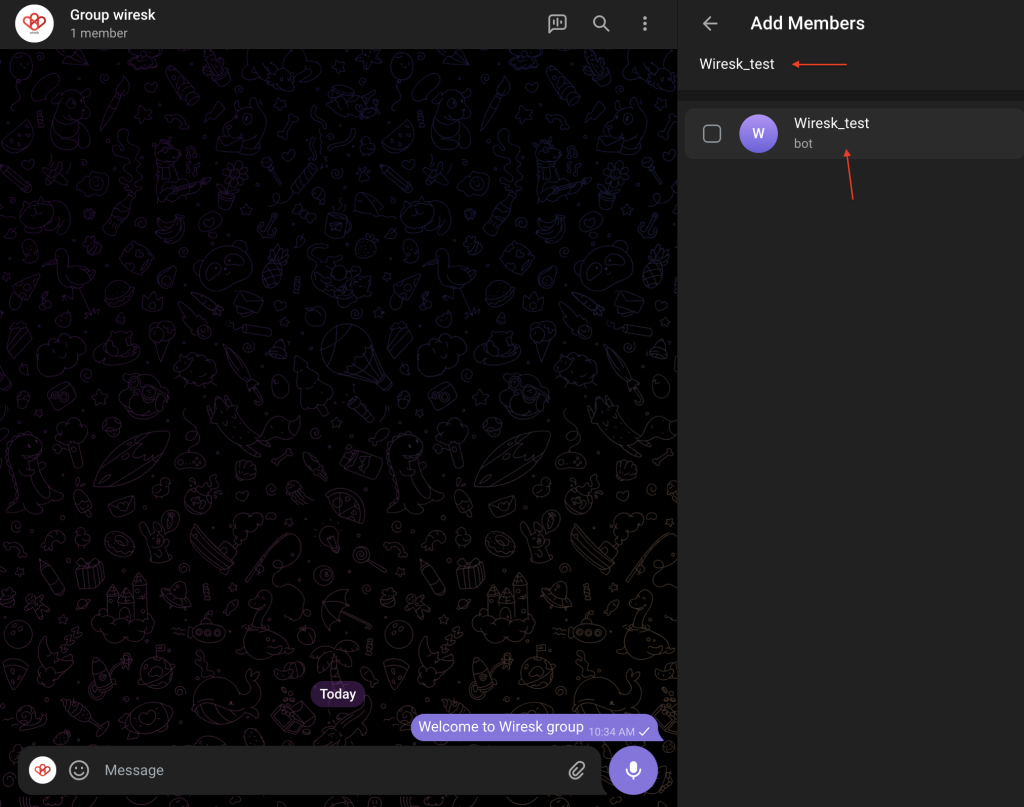
Select your bot and click on the “next” button, then click on “ADD” button. Voila, you have added your bot to your telegram Channel or group.
Promote the Telegram Bot to Admin: Copy Link
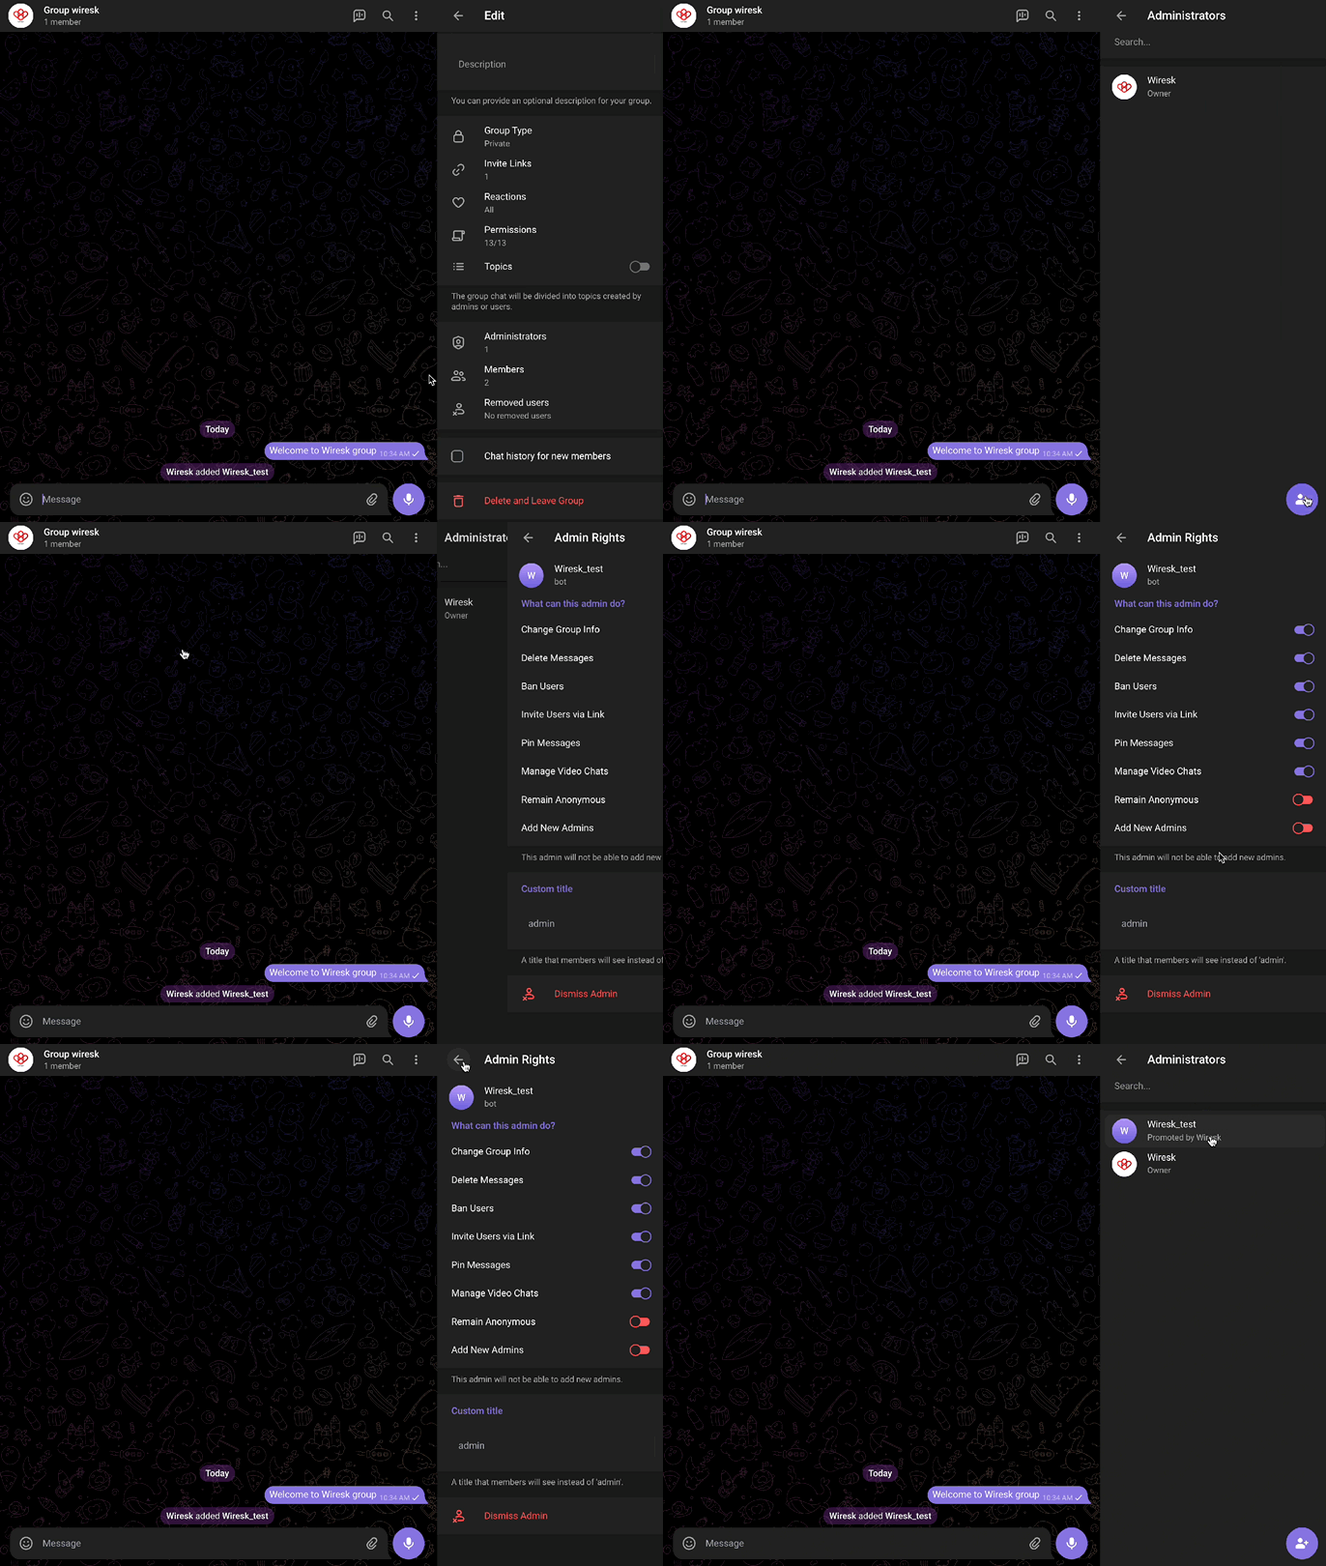
Like in the previous step “how to add members”, open your channel or group then go to info settings by clicking on its name > Pen icon to edit.
Now, scroll down and select “Administrators”, then click “add Administrators” button > select your bot member you previously added.
In this step you can check the admin permission given to your bot, keep the default permission then click on the “go back” button. Here, you can notice that your bot has been promoted.
Get the Chat ID of your Telegram bot: Copy Link
- Click here: userinfobot or go to your Telegram desktop app then search @userinfobot.
- In the chat, click on Start or send any message.
- Userinfobot will send back a message with your Telegram bot Chat ID.
- Keep it for later use in your Flows.
Get the Chat ID of a Telegram Public channel or Group: Copy Link
Log in to Telegram Web in your browser( To log in using the Telegram Mobile App, go to Settings > Devices > Link Desktop Device and scan the QR code).
Click on the chat of your Telegram Public Channel where you intend to send the message and have included your Telegram bot. Look at the browser URL, you can see your Public channel or group name with “@”,the Chat ID of your Public Channel or Group will be “@name”, in our case it’s “@wiresk”.

Get the Chat ID of a Telegram Private channel or Group: Copy Link
Log in to Telegram Web in your browser( To log in using the Telegram Mobile App, go to Settings > Devices > Link Desktop Device and scan the QR code).
Open the chat of the Telegram Group/Channel where you want to send the message and have added your Telegram bot.
When you click on chat of the Telegram Group/Channel, you can find the Chat ID in the URL. For example, if the URL is web.telegram.org/k/#- 2466415175, then “-2466415175” is the Chat ID of the Telegram Group/Channel.

D – How to find your Telegram Bot Message ID Copy Link
Get your message ID manually: Copy Link
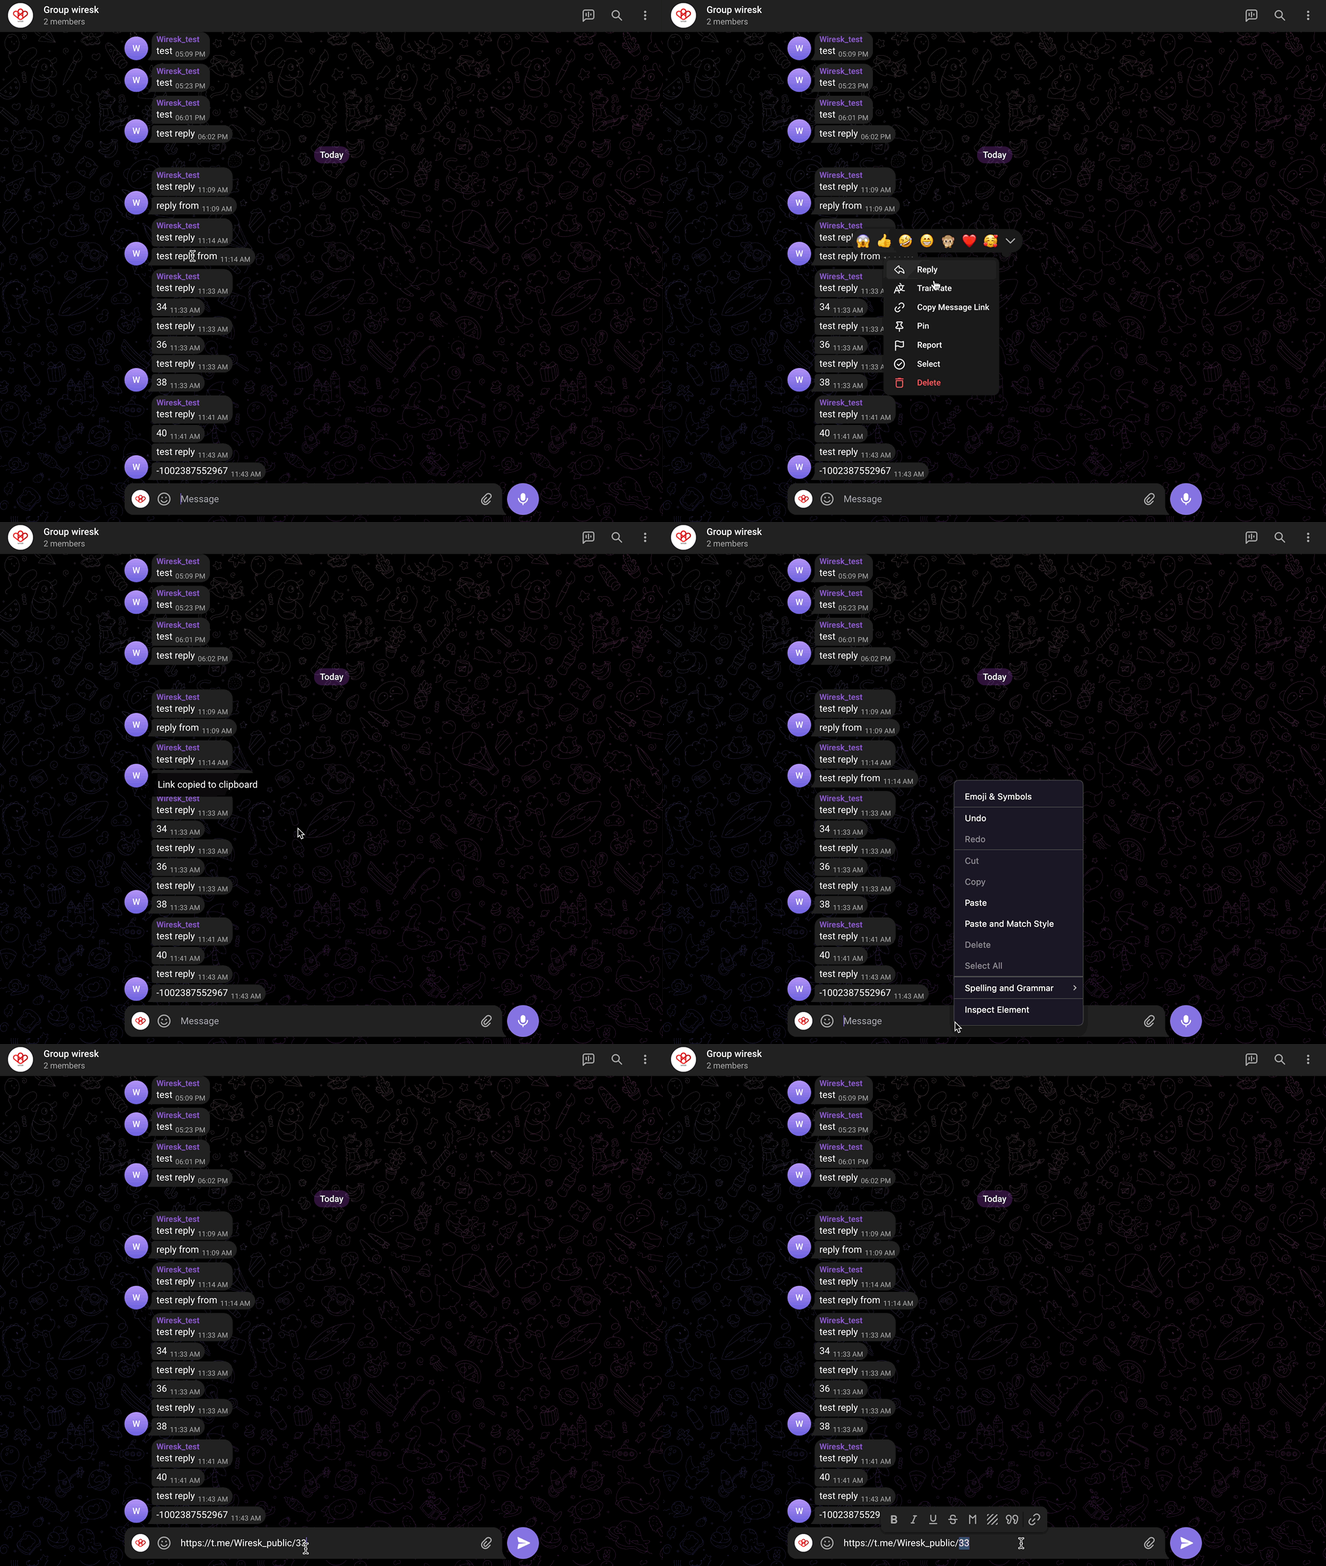
Go to your Telegram Web in your browser (To connect using the Telegram Mobile App, go to Settings > Devices > Link Desktop Device and scan the QR code).
Open a chat from a channel or a group, click right on the message you wish to reply to then select “copy message link”.
If it a public group or channel, you will get a link in this format: https://t.me/Wiresk_public/33
If it’s a private group or channel, you will get this format: https://t.me/c/2466415175/4//t.me/c/2466415175/33
In our example, the number “33” is your message ID.
Get your message ID from a previous step in the Flow: Copy Link
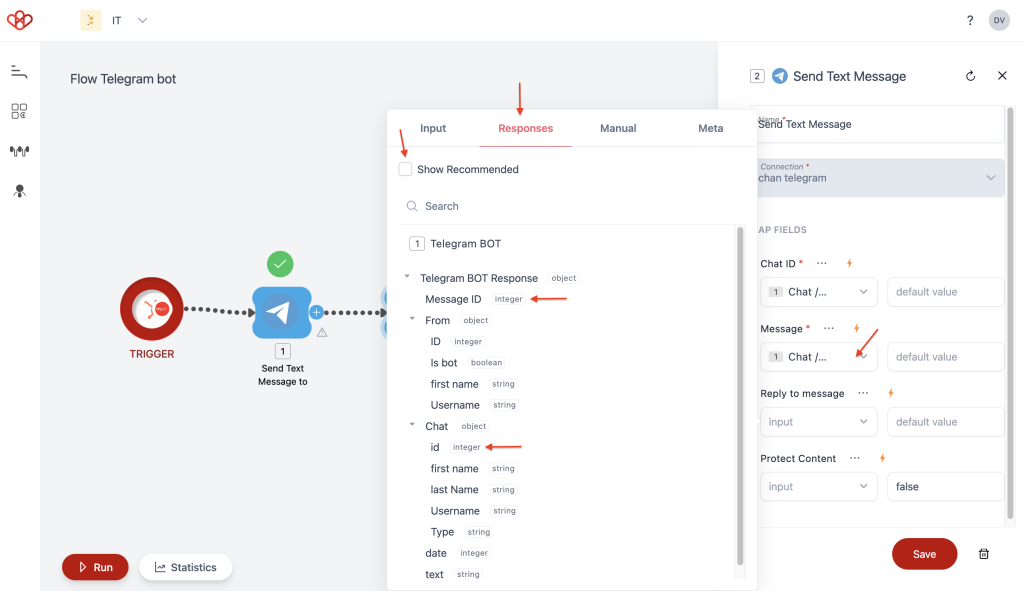
You can Map your Message ID or Other fields from a Step response within your Flow.
Add a Method in your Flow, in the configuration screen, click on the message ID input field, then select the Responses tab.
Uncheck “Show recommended” case, then just select the message ID shown by the red arrow. You can repeat these steps to map the other fields.
3 – Telegram Bot Method settings Copy Link
What your automation will do…
A – Add a Method to your Flow Copy Link
The Methods are like mini programs, it will perform a specific task on a particular app or service you’ve connected to Wiresk like get info or send emails.
You can add multiple Methods for complex Flows.
On the Flow builder screen, click on the plus button (+) next to your Trigger, then search or scroll down to select your apps Methods
B – Add Wiresk Tools to your Flow Copy Link
If you want to build a complex Flow, Wiresk offers a selection of tools at your disposal. Refer to Wiresk’s Tools
To add Tools in your Flow, Follow the same step as adding the Methods. On the Flow builder screen, click on the plus button (+) then just click on the “Tool” tab and select the Tool that you want to add. Refer to Tools documentation for a list of available Tools.
C – Telegram Bot Method lists and parameters Copy Link
C.1 – Message Copy Link
Forward Message Copy Link
Use case:
Messages from one channel (e.g., a customer support group or order notification) are forwarded to another relevant party (e.g., a sales team group, a manager, or a designated alert channel).
Configuration Table:
| Name* | Forward a Message |
| Connection* | Select your connection or create one |
| Map Fields | |
| From Chat ID* | Enter or Map the Chat ID, see “how to get the chat ID” in the previous steps. |
| From Message ID* | Enter the ID of the original message. You can get it from Mapping the data from a previous Telegram bot Method step or get it manually, refer to “how to get the message ID”. |
| Target Chat ID* | If the message is a reply, enter the ID of the original message. You can get it from Mapping the data from a previous Telegram bot Method step or get it manually, refer to “how to get the message ID”. |
| Protect Content | Protects the contents of the sent message from forwarding and saving |
(*) required field
Send Text Message Copy Link
Messages can include static text or dynamic content (data Mapped from other app integrations).
Configuration Table:
| Name* | Send text Message |
| Connection* | Select your connection or create one |
| Map Fields | |
| Chat ID* | Enter or Map the Chat ID, see “how to get the chat ID” in the previous steps. |
| Message* | Enter or map the message text to send. |
| Reply to Message | If the message is a reply, enter the ID of the original message. You can get it from Mapping the data from a previous Telegram bot Method step or get it manually, refer to “how to get the message ID”. |
| Protect Content | Protects the contents of the sent message from forwarding and saving |
(*) required field
C.2 – Media Copy Link
Download File Copy Link
Configuration Table:
| Name* | |
| Connection* | Select your connection or create one |
| Map Fields | |
| File ID* | |
(*) required field
Send Audio Copy Link
Copy Link
Configuration Table:
| Name* | |
| Connection* | Select your connection or create one |
| Map Fields | |
(*) required field
Send Document Copy Link
Copy Link
Configuration Table:
| Name* | |
| Connection* | Select your connection or create one |
| Map Fields | |
(*) required field
Send Invoice Copy Link
Copy Link
Configuration Table:
| Name* | |
| Connection* | Select your connection or create one |
| Map Fields | |
(*) required field
Send Media Group (Album) Copy Link
Copy Link
Configuration Table:
| Name* | |
| Connection* | Select your connection or create one |
| Map Fields | |
(*) required field
Send Photo Copy Link
Copy Link
Configuration Table:
| Name* | |
| Connection* | Select your connection or create one |
| Map Fields | |
(*) required field
Send Sticker Copy Link
Copy Link
Configuration Table:
| Name* | |
| Connection* | Select your connection or create one |
| Map Fields | |
(*) required field
Send Video Copy Link
Copy Link
Configuration Table:
| Name* | |
| Connection* | Select your connection or create one |
| Map Fields | |
(*) required field
Send Video Note Copy Link
Copy Link
Configuration Table:
| Name* | |
| Connection* | Select your connection or create one |
| Map Fields | |
(*) required field
Send Voice Copy Link
Copy Link
Configuration Table:
| Name* | |
| Connection* | Select your connection or create one |
| Map Fields | |
(*) required field
C.3 – User & Group Copy Link
Ban a Member From the Chat Copy Link
Copy Link
Configuration Table:
| Name* | |
| Connection* | Select your connection or create one |
| Map Fields | |
(*) required field
Create Chat Invite Link Copy Link
Copy Link
Configuration Table:
| Name* | |
| Connection* | Select your connection or create one |
| Map Fields | |
(*) required field
Get Chat Member Count Copy Link
Copy Link
Configuration Table:
| Name* | |
| Connection* | Select your connection or create one |
| Map Fields | |
(*) required field
Restrict Chat Member Copy Link
Copy Link
Configuration Table:
| Name* | |
| Connection* | Select your connection or create one |
| Map Fields | |
(*) required field
After setting up your Flow, you can choose to:
“Run once”, your Flow will run only a single time. You can use this function to test your Flow.
“Run Scheduler” will automate your Flows with the recurrence rule you previously defined.
For more details, refer to How to run a Flow tutorial in our Help Center.
4 – Popular Gmail integration: Copy Link
Explore our Templates gallery.
If you need an integration that you cannot find in Wiresk, you can make a request to our team, and we will try our best to satisfy your needs.